New Japan Saganishiki website:
http://www.saganishiki.com
Website still under construction but visitor can see what is offered.
Saturday, August 16, 2014

Tuesday, July 29, 2014
New Saganishiki Website
Soon there will be a new Saganishiki website. I will post URL once file is loaded.
Friday, July 5, 2013
New Saganishiki web site
Mr. Saganishiki now has a new web site:
http://www.saganishiki117.sakura.ne.jp/index.html
Sorry but only in Japanese.
http://www.saganishiki117.sakura.ne.jp/index.html
Sorry but only in Japanese.
Wednesday, February 8, 2012
Saganishiki School
Izumi: Graduate School of Traditional Arts and Crafts. School near Tokyo that offers a graduate degree in three of the traditional arts and crafts: lacquer, brocade weaving and Saganishiki.
The school is for developmentally disabled and autistic individuals.
Please visit their website: http://homepage2.nifty.com\aisenkai
The school is for developmentally disabled and autistic individuals.
Please visit their website: http://homepage2.nifty.com\aisenkai
Sunday, April 17, 2011
Kurume kasuri
 Visited a master of Kurume kasuri in October. This is the studio of Tetsuya Matsueda. He is the fifth generation of this art. His grandfather became famous for developing a technique of shading the indigo in his designs.
Matsueda-san won an Award of Excellence at the 2010 Exhibition of Japanese Traditional Crafts Art.
 An example of Kurume kasuri, splash design.
 Pattern being applied to the white cotton thread.
 Inked pattern now wrapped with linen as a resist.
 Indigo dyepots.
 Dyed thread woven with splash design.
Moyoori

Learning the moyoori technique of Saganishiki.
Required learning how to graph the design and transfer that pattern into each woven row. Still at the beginning of the process but learning through my mistakes.
Thursday, July 8, 2010
Saganishiki history is fairly recent compared to many of the famous Japanese weaving techniques.
It has similarities to nishiki, woven brocade. However, there is no supplemental warp with Saganishiki.
A search of the literature reveals a multitude of entries referencing the origination of the art. It was developed by the Nabeshima clan who, unfortunately, kept it secret. There was no sharing of this technique nor written history.
It is a history that has been passed down, and thus modified, as that information was exchanged.
Saganishiki was created by the Nabeshima clan around 1800 in Kashima, Saga Prefecture, Kyushu Island.
Princess Kashioka was ill and confined to her bed. She would gaze at the ceiling and asked if the ceiling design could be woven.
One of her attendants, born in Kyoto, used a paper weaving technique to recreate the ceiling design. The weaving was kept secret by the Nabeshima clan so that it could not be copied.
The first design was ajiori, a wicker pattern using paper for the warp and weft. As experience progressed, the warp remained paper but the weft was changed to silk thread.
The weaving technique waned over the years. Many members of the Nabeshima clan began to move away from Kashima in search of employment. With them, went the knowledge of the technique.
The Meiji restoration brought Japan out of the feudal era and improved the political and social structure. The Emperor Meiji revitalized the occupation of weaving. Saganishiki also began to acquire new interest and scope beyond the Nabeshima.
The greatest resurgence of Saganishiki occurred with the 1910 Japan-British Exposition in London. In order to get some recognition of his hometown Prefecture Saga, Shigenobu Okuma, a former Prime Minister, facilitated the entry of a piece of Saganishiki woven by Sagara Yoshiko. He had the weaving renamed Saganishiki to reflect Saga Prefecture. Kashima, the origination of the weave is a town in Saga Prefecture.
It has similarities to nishiki, woven brocade. However, there is no supplemental warp with Saganishiki.
A search of the literature reveals a multitude of entries referencing the origination of the art. It was developed by the Nabeshima clan who, unfortunately, kept it secret. There was no sharing of this technique nor written history.
It is a history that has been passed down, and thus modified, as that information was exchanged.
Saganishiki was created by the Nabeshima clan around 1800 in Kashima, Saga Prefecture, Kyushu Island.
Princess Kashioka was ill and confined to her bed. She would gaze at the ceiling and asked if the ceiling design could be woven.
One of her attendants, born in Kyoto, used a paper weaving technique to recreate the ceiling design. The weaving was kept secret by the Nabeshima clan so that it could not be copied.
The first design was ajiori, a wicker pattern using paper for the warp and weft. As experience progressed, the warp remained paper but the weft was changed to silk thread.
The weaving technique waned over the years. Many members of the Nabeshima clan began to move away from Kashima in search of employment. With them, went the knowledge of the technique.
The Meiji restoration brought Japan out of the feudal era and improved the political and social structure. The Emperor Meiji revitalized the occupation of weaving. Saganishiki also began to acquire new interest and scope beyond the Nabeshima.
The greatest resurgence of Saganishiki occurred with the 1910 Japan-British Exposition in London. In order to get some recognition of his hometown Prefecture Saga, Shigenobu Okuma, a former Prime Minister, facilitated the entry of a piece of Saganishiki woven by Sagara Yoshiko. He had the weaving renamed Saganishiki to reflect Saga Prefecture. Kashima, the origination of the weave is a town in Saga Prefecture.
Wednesday, June 23, 2010

Japan May 2010
One of my stops this trip was to meet Bryan Whitehead. Bryan is living every fiber artists dream.
He had been living in Japan for the past 25 years in a very old traditional Japanese farmhouse.
Pictured here in his shop in the Fujino town center, Bryan demonstrates backstrap weaving.
 Bryan raises his own indigo and prepares the leaves in the traditional Japanese method of fermentation. He maintains an indigo dyebath at both the shop and house.
Of special note, he raises his own silkworms, then reels, dyes and weaves the silk.
Dyeing includes the indigo as well as other natural dyeing vegetation.
Please visit his website: www.japanesetextileworkshops.blogspot.com/
Wednesday, June 16, 2010
Japan, May 2010
Recently returned to Japan for more lessons and shopping.
Spent a few days in Tokyo purchasing Saganishiki thread and warp paper. Also visited a number of shops that sell accessories.
Lessons focused on Moyoori this visit. Very complicated and most went over my head. I like the technique and want to continue. I prefer combining design with pattern.
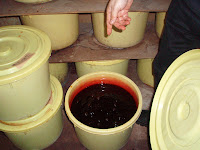 While in Kyushu, visited Akizuki to observe the use of the cherry tree in the making of a pink dye. Mr. Yasuhisa Komuro claims he is the only dyer who has had success making the pink color from the cherry tree. It takes 3 months to make the dye using select parts of the cherry tree. Three colors can be obtained: beige, orange and pink.


Recently returned to Japan for more lessons and shopping.
Spent a few days in Tokyo purchasing Saganishiki thread and warp paper. Also visited a number of shops that sell accessories.
Lessons focused on Moyoori this visit. Very complicated and most went over my head. I like the technique and want to continue. I prefer combining design with pattern.
 While in Kyushu, visited Akizuki to observe the use of the cherry tree in the making of a pink dye. Mr. Yasuhisa Komuro claims he is the only dyer who has had success making the pink color from the cherry tree. It takes 3 months to make the dye using select parts of the cherry tree. Three colors can be obtained: beige, orange and pink.

Wednesday, April 14, 2010
Ageaya

Proceeding well with ageaya. It is an easy weave once heddles are established. Gives more 'sparkle' to the fabric but washes out the color. I like the effect.
Sunday, February 21, 2010

Thursday, February 18, 2010

Wednesday, December 23, 2009


Sunday, December 13, 2009

Tuesday, December 8, 2009

Mr Saganishiki had quite a time getting my loom and warp back in proper working order.
I was weaving way to tight and the warp was getting smaller and smaller.
By using the koyori, he was able to spread the warp out.

It took a few koyori to get everything well spaced.
Making the koyori is a skill that takes much practice. It is simply using a strip of paper and rolling it tight. Easier said than done!

There are many ways to make heddles but I like this one.
The heddle that comes with the loom from Echizenya is metal with paper warp holders. The soboko I got from Tokyo is nice and easy to use but is expensive and cannot be used for pattern heddles.

Materials are prepared to make the heddle.

Heddle done.
Ready to weave!
Wednesday, December 2, 2009
Returned from a great trip to Saga, Kyushu Prefecture, Japan. I took lessons from Mr Saganishiki. What a wonderful person who taught me so many 'tricks of the trade' in Saganishiki. My previous lessons were good to get me started but he enlightened me with the rationale of why things are done a certain way. He also showed me lots of shortcuts that will save me time.
What I liked about him was his desire to bring Saganishiki more in line with today's lifestyle. His Balloon lamp and dolls are creative and exquisite.
I still like the traditional uses for the fabric such as the jewelry and dolls.
We visited two sites that promote the weavers in Saga.
Some of my favorites:


The skill of these weavers is amazing. There are about 160 weavers of Saganishiki in Saga.
There is not an organized guild for weavers as we have in the US. Nor is there an organization such as Handweavers of America. There is not the same style of sharing and learning of skills/techniques that we depend upon to learn and promote the weaving craft here.
Some non weaving photos in Saga and Arita:


What I liked about him was his desire to bring Saganishiki more in line with today's lifestyle. His Balloon lamp and dolls are creative and exquisite.
I still like the traditional uses for the fabric such as the jewelry and dolls.
We visited two sites that promote the weavers in Saga.
Some of my favorites:


The skill of these weavers is amazing. There are about 160 weavers of Saganishiki in Saga.
There is not an organized guild for weavers as we have in the US. Nor is there an organization such as Handweavers of America. There is not the same style of sharing and learning of skills/techniques that we depend upon to learn and promote the weaving craft here.
Some non weaving photos in Saga and Arita:


Friday, May 29, 2009
Current project
Pattern inspired by Mr "Saganishiki"-sama: http://saganishiki.iza.ne.jp/blog/entry/897757/
I did this pattern on the 30 cut and now this is the 45 cut:

I initially did each row by pickup. Now I have 3 pattern rows on 'soboko' to make the weaving faster. There are 16 rows per sequence.

Two pattern rows occur 2 times in the sequence. All others, only once each. Lots of pick-up!

It is a nice looking weave structure and not too difficult for this beginner.

I thank Mr. "Saganishiki"-sama and his blog for great ideas and patience in his teaching.
Pattern inspired by Mr "Saganishiki"-sama: http://saganishiki.iza.ne.jp/blog/entry/897757/
I did this pattern on the 30 cut and now this is the 45 cut:

I initially did each row by pickup. Now I have 3 pattern rows on 'soboko' to make the weaving faster. There are 16 rows per sequence.

Two pattern rows occur 2 times in the sequence. All others, only once each. Lots of pick-up!

It is a nice looking weave structure and not too difficult for this beginner.

I thank Mr. "Saganishiki"-sama and his blog for great ideas and patience in his teaching.
Sunday, April 19, 2009
 I recently acquired a Saganishiki loom. It appears to be old but I cannot find much information about where it came from. The woman in New York (an accomplished weaver, but not of Saganishiki) said she purchased it from a friend who bought it at an estate sale. The estate sale was for a woman, recently deceased, who collected unique looms. The box the loom came in was labeled "Obi Loom".
  These were two of the warps that were included. One is gold and the other silver. They are packaged so that they are creased at the fold. One drawback with this is that the crease may show in the finished fabric. I don't know if this method is still used. If not, I wonder when it was stopped?
Today, the warp is left at full length, wrapped in stiff paper, then gently folded so that no crease is formed.
 The knobs are interesting in that a round metal plate with protrusions is attached to the wooden disc. They fit into the holes in the metal plate. The knobs are used to advance the paper and then locked into place to prevent movement when weaving.
I have asked a fellow weaver in Japan and one in Texas if they know anything about this particular design. I believe it is important to identify the origin of a loom: made in USA or Japan. If Japan, what Prefecture. So much information about Saganishiki is unavailable in the US due to language barriers, lack of published weaving information in Japan, and limited number of people who do this type of weaving.

Wednesday, April 8, 2009
Saganishiki weaving equipment
 The Saganishiki loom is relatively small, approximately 17" by 13". It is made of very light weight wood. The wood on each end is 5" in height. Underneath are two rollers that protrude on both sides. Rice paper
Various sized sticks are used in the weaving process.
The largest is a beater stick.
The largest is a beater stick.
The second one is used to pick up warp threads when weaving a pattern.
The third stick is used as a tabby place holder.
The bottom two are older versions of the ones above.
 Shuttles come in a variety of sizes, based upon the width of piece you are weaving. Silk thread is wound on the shuttle.
 The sokobo is used as a heddle. For simple weaving, only one is used and serves as a tabby. When used in conjunction with the tabby stick, it then opens the second shed.
Some Saganishiki schools use a metal bar, with paper attached, in place of the sokobo.
Others may sue a round stick that has the warp threads attached to it.
More than one soboko can be used if doing a twill patterns but needs to be limited to 6 or else it becomes too heavy.
 Soboko threaded.
 Silk thread. The thread comes in a variety of sizes. Use the size thread that correlates to the warp cut. Example: 30 cut warp, use a #30 silk thread.

Warp is rice paper that is laquered for strength and durability. It can come with either imitation or gold leaf laminated to the top surface. Silver or platimum are other metal alternatives. Other laquered surfaces are available from black to varigated. Each end is solid paper which is glued to the rice paper on the rollers.
The size is the number of cuts in 3 centimeters. The cut range is from 35-60,with 60 being the finest.
Subscribe to:
Posts (Atom)


